How about the PM2.5 wiring, I have 8 wires yet only 6 are on the board? 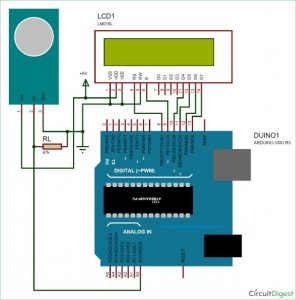 Thank you, Dejan! I used SOLIDWORKS for that purpose, and made the simplest case possible consisting of just two parts and few bolts and nuts.
Grove Air quality sensor v1.3 is designed for indoor air quality testing. The Arduino simply just sends the values from the sensor to the display and vice versa, the display sends data to the Arduino when needed.. If you are finding an affordable air quality sensor module without breaking your wallet, we would recommend the Grove Air Quality Sensor v1.3 Arduino Compatible. Best regards and thank you for this very usefull and intresting project, Hi Glad to see you build it! The brain of this project is an Arduino Pro Mini board which in combination with a 2.8 Nextion touch display provides a decent user interface. To find out more information about this sensor, you can view our wiki page. Very interesting Project, however, standalone is a bit limiting. R6 100k I started with making the schematic for the project. This sensor requires 5V to operate so you would require a board that supplies 5V like an Arduino UNO. Pin headers . Thanks for the project. Can you check that with your experience? Many times we feel very weak while waking up from the bed even after getting a good sleep at night. Just analog values from 0 to 1024. On the other hand, the two resistors at the PMS5003 Sensor are used as voltage divider. These are heated metal oxide sensors and their principle of work is based on detecting change in resistance at the presence of targeted gases. Yes. Here you can download the Arduino Code and the Nextion Display Program: For uploading a sketch to an Arduino Pro Mini board, in the Arduino IDE first we need to select this board, select the proper version of the processor, select the port and select the programming method to USBasp. HowToMechatronics is an education website in the area of Mechanical, Electrical and Computer Engineering. I have checked the geating supply and that seems to work ok as the input on the transistor is also reflected on the output of those. All rights reserved. The target gas of the MQ131 sensor is just Ozone, which in a normal household can be generated by products like certain air purifiers, facial steamers, germicidal lamps that produce ultraviolet light and so on. The MP503 has a small notch which should be pointing up. The power to the board will come from a mini-USB connector to which we can connect 5V. As for the electronics, I think you should be fine as if you connect everything as explained everything will be fine. This sensor works on the principle of laser scattering. Can we use NRF24L01 module make it send massage when are away. Monitoring the quality of the air may actually be more important than you realize. in the Altium schematic snapshot you used a 10k sensing resistor for the VOC sensor, while the resistors R6/R7 seem to be interchanged (but still that would be 100k for the sensing resistor); also the voltage divider R1/R2 has to be vice versa in order to get 3.3V from the Arduino 5V On the other side of the infrared source, there is an optical filter and an IR detector which measures the amount of IR light that passes through. Have You Ever Seen A Pig Live Stream | IoT Application on Helium Network with SenseCAP S210X Series. The two transistors are used for activating the sensors heaters. These air quality detector modules are installed with sensor modules that can detect a wide range of Volatile Organic Compounds (VOCs) and are intended for indoor air quality monitoring. With so many air quality sensors with different features and functions out in the market, it is hard to pick which air quality sensor will fit your Arduino / Raspberry Pi project the best. Finally, running the ozone calibration code included with the library and changing RO in the arduino code really stabilized the readings. This sensor is also equipped with a fan to maintain constant airflow across the sensing chamber. Once we upload the code to the Arduino, we also need to upload a code to the Nextion display.Nextiondisplays have built-in ARM controller which actually controls the display on its own. The ciruict board really simplifies the assembly and makes for a nice package. In addition, we have a wiki page for all our products including this PM2.5 sensor. In the current configuration thats not possible. Higher values means there is a presence of VOC. Sure its possible. I have built one based on what you have given.
editor where we can create all these stuffs. With this the PCB is actually done, and whats left to do now is to prepare the cables that we will use for connecting the PM2.5 sensor and the display to the PCB. The results from this sensor are also quite accurate. volatile renesas detecting compounds ip67 robu Please note that you can find more info on the Arduino code itself as there is explanation in the comments of the code. This sometimes happens because of the poor air quality in the closed room at night.
I like this project so much even from the Arduino robot arm with smart phone control hello have you seen my arduino nano version ? With a tiny outline as well, you can easily integrate it into your air quality monitor or system. Christian. In the coding part you will need to install some library to run the code. The display has a card reader where we can insert the microSD card while the power is off. Capacitor values, resistors, transistors, header pins, switches and usb connector. Then I passed through a blade from a mini hacksaw and carefully cut the shape. Hey, thanks!  On top of the waveform, as well as the numbers on the main screen, you can notice we have like transparent objects, called Hotstops in the Nextion editor, and they are act as buttons. With a IC digital interface, it simplifies the hardware and software design, enabling faster time to market. If you have experience with Arduino it should not be that hard to implement it, but still there are quite some modifications to be done. Right above the power supply connector we need to solder the two switches. Todays guide will cover and compare these few air quality sensors which fall under 2 categories: Before we move on, we must know which TYPE of Air quality detectors we want before we purchase one. I have everything on order except the passive components. nice that you publish a project again, I always wait with excitement for the next projects, I will definitely build your completely new project, .
(Maybe it was the cheap part I bought!) As for the Ozone sensor, in order to get more accurate outputs we must set the setTimeToRead() and setR0() values correctly according to the calibration example of the library. function it read the analog value from the Air quality sensor, and define the quality for that corresponding, . Striking the perfect balance between power and ease of use, Altium Designer has secured its position as the most widely-used PCB design solution on the market. in the attached schematic files, the voltage divider R1/R2 is correct, but the resistors R6/R7 are still interchanged (and now back up to 1M). There is no direction mark or anything else. Also you need to adjust the setR0(value) according the the Calibration example. Distance / Spacer Nuts M3 . R2 1k Measure and log indoor air quality. 
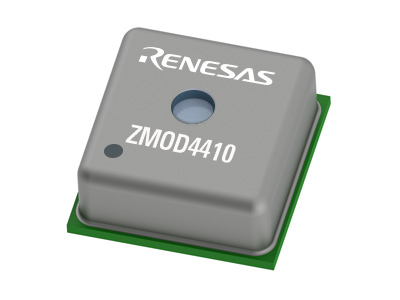
If youre not sure which gas sensor to pick, do check out our Seeed Gas Sensor Selection Guide to help you choose the gas sensor that best suits your project needs! I started by inserting and soldering the smaller components first, the resistors and the two transistors. The CO2 gas molecules which are present in the air that we are measuring absorb a specific band of IR light while letting some wavelengths to pass through. Then using a 3mm drill I made all the holes for attaching the PCBs and connecting the two acrylic plates together., At this point, I removed the protective foil from the acrylic which, and to be honest, thats quite satisfying process. I have updated the article in the parts list section, please take a look now. Hey, thanks! It was exactly something I was considering to make in the near future. WiFi-connectivity would be a great benefit! Altium Designer has built-in libraries with basic electronic components, but even better you can search for components directly from manufacturers which makes sourcing components for your project very convenient. Use the same connector as it is for the sensor side, and on the other side get rid of two wires, and solder a pin header or anything so you can connect it to the board. Meet the Third Batch of 28 Free Hardware Winners: Submit Your Sustainability Project Ideas to Seeeds IoT Into the Wild Contest for Sustainable Planet 2022 by August 8th! Have you ever wondered about the quality of the air you are breathing, or maybe, why you sometimes feel sleepy in the office or tired in the morning even after sleeping all night? HowToMechatronics is a participant in the Amazon Services LLC Associates Program, an affiliate advertising program designed to provide a means for sites to earn advertising fees by advertising and linking to Amazon.com. So, lets get started. or maybe even an ESP32? So the variable name, then .val, then the value, lets say 22. Particulates are the most harmful form of air pollution because they can penetrate deep into the lungs, blood streams and brain, causing many health problems. Need inspiration for project ideas or project tutorials? So we use smaller values like 5 to 10 seconds and thats why we dont get accurate results, but we have to use smaller values otherwise everything else will be frizzed for example for 200 seconds. Cheers! And the sendSensor() function measure the temperature and humidity data with, function you might need to celebrate your. This project no. This device has four main components or air quality sensors. I created most of the components for this project on my own, as I wanted to create my own 3D footprints for each part so that at the end, I would get the whole PCB in 3D. So what do you think of these air quality detectors? Only the latter have found their way into classrooms in the fight against Covid-19 because they proved to be sufficiently reliable. When I press any parameter, it says Please wait, stay in this main screen for ever. So, we definitely need a PCB for this project. Hey, glad to hear it, thanks! Hey, glad to hear it, thanks! This project is so cool! Regarding Altium Designer, looks really great however price tag is out of this world for hobbyist, unfortunately. this is my second project or third I think. The code is not well optimize and not properly set to get accurate values from the Ozone sensor. This sensor comes at a slightly higher price tag compared to the above 2 sensors and has similar specifications compared to the other sensors. So the BME280 could be a good implementation, agree? However you did figure them out quite well, and your points are correct.
Dejan, This sensor is then implemented on a breakout board like the one you see above done by Sparkfun where you can use it as an I2C device. Which one would you pick? Now we just have to remove the card, switch on the power again, and our air quality monitor will start working.. R5 1k And as for the MQ-131, it can be set in any direction, as the pins 1 and 3 and 4 and 6 are connected to each other, basically the same connection. Ever thought of changing the arduino pro mini to maybe an ESP32? The resistors for activating the heaters of the two sensors (connected to the base of the transistors) are used for limiting the transistor base current. Can this air quality monitor send data to mobile app through wireless network?
So what is the difference between the PM2 5 air quality sensor and the air quality sensor modules? Everything works at this movement, except the 24 hrs plot.
An infrared source directs light through a tube which is filled with the air that we are measuring. Nevertheless, now I will walk you through the entire process of building it and explain how everything works. In the air_sensor() function you might need to celebrate your gasLevel value for your sensor. Once I finished the schematic, I generated the PCB. I hope you enjoyed this video and learned something new. Feel free to ask any question in the comments section below and check myArduino Projects Collection. Does the oriantation matter? So, in this tutorial we will learn how to build our own Air Quality Monitor which is capable of measuring PM2.5, CO2, VOC, Ozone, as well as temperature and humidity. VOCs can cause many negative health effects including headaches, irritation to eyes, skin reactions, dizziness and so on. Well they are indicated with D6 and A0 in the diagram. arduino circuit diagram mq gas using measuring sensors ppm ammonia maker sensor read Have you considered swapping the ProMini for an ESP 8266? A specific electrical current pass through a metal substrate and the resistance changes according to the amount of gas present. I will explain how each of air quality parameters affect us and how the sensors work. As far as is understand the datasheets Stay healthy too, cheers! Priced at only $9.90 its price is half of the CCS811 and SGP30 sensors. If needed, we can manually create or adjust them. Grove Laser PM2.5 Air Quality Sensor for Arduino HM3301, Grove Air Quality Sensor v1.3 Arduino Compatible, Seeeds Grove Laser PM2.5 Air Quality Sensor for Arduino HM3301, Adafruit SGP30 Air Quality Sensor Breakout VOC and eCO2, Notice on Product Name Change for Our LoRa-enabled Products. A cheap DIY air quality monitoring device. In this timer event we also have a code for changing the background color for each sensor depending on its value. the current limiting resistors R5/R7 for the transistors Q1/Q2 should be 1k Using a simple rasp, I smoothed out shape.
I wish you will answer soonly.With my greeting kirubel. You would need a SD card module for that purpose and modify the code accordingly. All right, so now we can power up the device and upload the program. It captivaded me right away and I wanted to give it a try and build it. The hours and the Y-axis values also get their values from the Arduino. This is convenient, for example, if we want to track the air quality in our bedroom during the night. It looks great with that case. CCS811 supports multiple measurement modes that have been optimised for low-power consumption during an active sensor measurement and idle mode extending battery life in portable applications. I also thought of an additional value, that can be given for AIR: Pressure! For making a PCB for this project, Im going to use Altium Designer which are actually the sponsor of this video. Hi Dejan, thanks for sharing your project i do the mecanum robot too. R3 10k Of course, what we need to do now is to make some kind of box or case for it. This is a low cost Air Quality Monitor which can monitor the air quality of a room using MQ135 air quality sensor. Get Excited! Im in the procces of gathering all the needed parts and would come back to you, if I have some other questions, if youre ok with it. Personally, we would recommend Seeeds Grove Laser PM2.5 Air Quality Sensor for Arduino HM3301.
I soldered male pin headers to the cable that comes with the sensor, and so I was able to easily connect it to the PCB. // Reset pin # (or -1 if sharing Arduino reset pin), DHT11 Temperature & Humidity Sensor (3 pins), Make Your Air Safer: Alerting Indoor IoT Air Quality Monitor, PPD42NS Arduino Air Quality Monitor in 3D Printed Enclosure, Arduino Air Quality Monitor with DSM501A Sensor, DIY Air Quality Monitor with Sharp GP2Y1010AU0F Sensor.
So, the Arduino reads the sensors and sends that data to the Nextion display. Hi Dejan! Nice project. Hey, Hey, make sure the Upload switched on down or off, and yeah, sometimes when you click it doesnt enter the plot. Not because its our product, BUT this sensor is the most cost-effective compared to the others while offering similar specifications. greenhouse arduino controller panel controlled electric wiring serious farming scale does software automated hackaday designing electrical