Most range between 36 to 40 inches; an average persons waist height. Fins closer to the tail end provide more drive; fins placed further from the tail end provide more manoeuvrability.Rails are an important, even if underestimated design feature. For instance, if you have shaped a 6ft shortboard, make sure you prepare at least 18 oz. Otherwise, lay the blank bottom-up on the stand, then stretch the sheet of fibreglass lengthwise, centring it as best as possible. There are a few theoretical bits we need to understand in order to have a functional, well-glassed board such as how glass schedules work, the difference between cloths and resins, as well as details about technique all of which you should plan ahead. Either that or a decent (functional) used one for sale in the san diego area. Image result for shaping stand surf board, I put together some old jarrah hard wood from the back yard and made a shaping stand for my new shaping bay, Wood Buddha - Building Wood Surfboards: Build Surfboard Shaping Stands for under $90. Again, you can figure out how high your glassing stand should be by considering your height. This is the most distinguishable feature of any surfboard, the one to give it not only its visual appeal but also influence its categorisation (e.g. Come back from the nose/tail and run the planer in a similar fashion, pushing it off the blank carefully.Repeat the same process with the other half of the bottom of the blank.

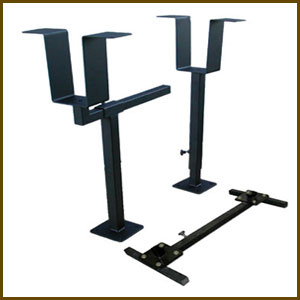
I hear you asking. If you have an air compressor, blow your clothes to remove the dust from it. Well, there is a shaping rack that tips over.
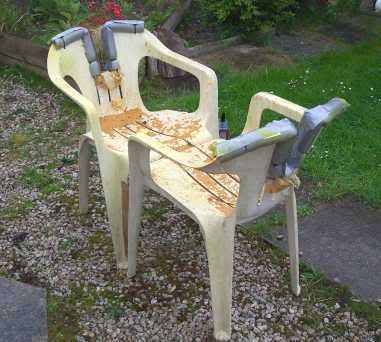
Aren't they the duck's plums? Now you are ready to mix the resin. The smoother, cleaner, and squarer/truer (90 degrees) you can make the rails, the easier and more precise will be the next steps of the shaping process.
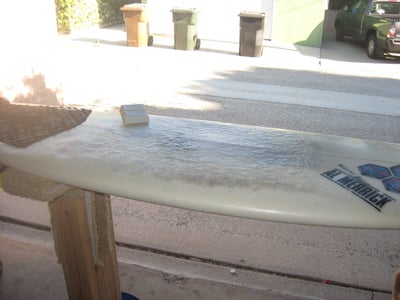
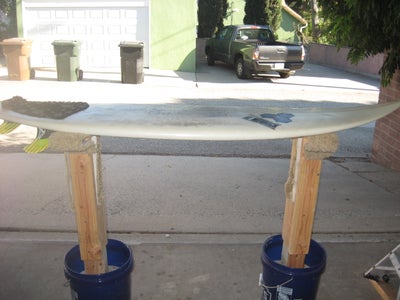
Failing to sand enough or messing up the resin mixtures can make or break your project. The objective of this stage is to remove whatever is left of minor bumps and scratches again, without re-shaping anything. Again, be careful not to over-shape anything. This category only includes cookies that ensures basic functionalities and security features of the website. Below are a few key points to know about surfboard design: The plan shape of a surfboard (meaning its outline) is always determined by its length from nose to tail and its width from nose to middle (wide) point to tail. But if you are keen to learn or feeling adventurous and want to give it a try, then read on. When it comes to the type of fibreglass cloths used in board-building, there are two common types the S-glass and the E-glass. You can research all you want, even consult experts, but nothing will tell you whether a board is right for you or not more than surfing it. Those who have chosen to add tints or pigments to the board should drop these once the mixture is ready. Nice looking setup! Part 1, outlines the basic list of tools and materials needed to shape a traditional EPS/PU surfboard, also running you through how to set up a proper workspace. But as this is not an essential part of board-building, and since it involves a whole other set of skills and tools, well skip straight to How To Glass A Surfboard which you will find below. In this series, we will show you how to make a surfboard at home, using some basic equipment and a makeshift shaping bay. Before switching on your planner, consult your final design and note the measurements of nose rocker (at the tip and 12 inches from it), tail rocker (at the back and 12 inches from it), board thickness (12 inches from nose and tail and at the centre). It might also be helpful to watch a video or two on glassing surfboards; that way you can have an even better idea of what the process should be like and will be able to study the technique of a more experienced glasser. Freelap: As mentioned above, the freelap technique is used exclusively for clear glass jobs. This is the procedure for a freelap. For the optimal padding, use clean masking tape to wrap the foam onto the rack. Organising Your WorkspaceOnce tools, materials, shaping rack and glassing stand are all set, you can finalise the preparation stage by adjusting a few elements of your workspace. I have filled five-gallon buckets with sand, its decent, but you have to watch out for water seeping in. If your stand is too narrow, chances are the blank will topple as you apply pressure when shaping and/or glassing. 1 x 1200 mm x 2400 mm x 17 mm sheet of CD ply ($65).
vm gm5l*SNwNd&O! 3
|!M d00K Un 3q]is&t{&6q0:_Aog]s)tY(sqO+31,'&I`A 9P\Ne`oGhEV`Q\,L{1a5$i%?6VJ,S!sSx.axdL&z=b;*yf. Slow hardeners should cure in roughly 4 hours, while fast hardeners take more or less 2,5 hours to achieve the final result. Customised CAD design: For those who want to create a fully customisable template, using CAD software is the best option. Whenever i have a little bit of left over lam/sanding resin left over, i'll pour it in the sand next to the post. The ultimate goal is to achieve a smooth, seamless transition on the bottom curve. "So why not make a set, Wood Buddha?" Otherwise, a simple brush or a vacuum cleaner will do. The biggest drawback here is that you will have little to no wiggle room when it comes to the design of standardised templates. If that is the case, use 80-grit sandpaper. With these two items you can set up and shape ANYWHERE within . This last stage is not part of the process, but there is a lot to be said about keeping your shaping bay clean especially if you have rented/borrowed the space from someone else. Once the tracing is done, the next step is to cut out your template with a jigsaw. This is usually measured by placing a square along the centre of the board and multiplying the distance between the stringer and the rail by two.A surfboards wide point is not necessarily the midpoint, but the widest point of its plan shape. Maybe someday it'll accumulate enough to make it more stable. Or visit your local shaper and ask for advice. That means avoiding overcomplicated features that may sound nice but can ultimately either give you a hard time or disrupt the shaping/glassing process which would negatively affect your surfboards performance. The art of surfing calls the surfer to do something with the wave, read it, feel when to turn and when to snap, when to pull into the barrel. It is also important to try to keep the blade as close to a 90-degree angle to the surface of the blank as possible since this will minimise any clean-up work later on and maximise your chances of getting an even, clean shape. Plus, it would take much longer than any of the above-mentioned. Empty cart. Is it padded?Whilst glassing stands dont need padding, shaping racks rely on it. The trusty old garden shed: A great place to call your shaping shack. A general formula for designing the rocker is to start with 5in at the tip of the nose and 2in at the tip of the tail. So it is only natural that, before sharpening your tools and prepping your mixes, you think about what kind of surfboard you want to build, what it will look like, how it should perform In fact, the design stage is probably the most important step in the process of building a surfboard. For glassing, you will also have to pay attention to the room ventilation as well as the temperature youre working in. Optimizing the lightingProper shaping rooms benefit from side lighting tubes of fluorescent light stuck horizontally to the wall at a particular height to assist the shaper in spotting imperfections on the blank, areas that need to be worked on. Check. Needless to say, riding a board that is too small for you will have a huge (and probably negative) impact on your performance, regardless of surf conditions. The ready mixture will take between 15-20 minutes to harden (again, depending on the room temperature), so make sure you work swiftly. try thishttp://www.surfersteve.com/stands.htm. a brick wrapped in a towel) to hold the blank down;A hard sanding block (e.g. A coat of varnish and it'll be as flash as a rat with a gold tooth. What Materials Do You Need to Make a Surfboard? So, before embarking on such a demanding project as building your own surfboard, borrow your friends board for a few minutes or go into a surf shop and ask if there are test boards available. Regardless of what method you choose, you will end up with a curved line traced on a sheet of Masonite or whatever the material of choice is. They have to be a bit higher as you often have to see and work on the underside of the board. Read on Oh wise and noble reader. It is easier to get your head around, takes less time, uses less material, and decreases your chances of messing up. Glassing is perhaps the most intriguing and demanding stage in board building. From then on, you can easily freehand the rest of the rocker and refine the curvature during the process of sanding. The resin will take anything from 2 to 8 hours to cure depending on the hardener and the temperature of the room. Surfboard Glassing Technique (Freelap vs Cutlap) Once you have established a glass schedule and decided on the type of resin, it is time to look at what type of glass job you want to do clear or tinted. Once the resin has cured, use an electric sander/polisher (see list of materials on Part I) to sand down the overlaps. Then it is just a matter of running the planer on the nose/tail ends until you have reached the desired rocker. A surfboard that is 6 foot and 5 inches in length, 22 inches wide, and 2 1/4 inches thick will paddle similarly to one that is 7 feet in length, 20 1/2 inches wide, and 2 1/4 inches thick. Its a good idea to use the low-cut setting in this step.Fine-tune the rocker with a Surform or a medium-grit sandpaper and sanding block. If you havent got the aforementioned, or if you feel like youre not up to the task, we suggest you dont even put yourself through this ordeal. And whilst it can be daunting to imagine yourself jumping head-first into such a seemingly complicated and demanding venture, it is still very much possible to make your own boards at home without prior training. Once you are happy with the results, flip the board around and blend the other rail. Instead, square off the tail of the template and leave the shaping of the swallow tail for the end of the process. Below we lay out the process of mixing both types of resin epoxy and polyester.
Cutlap: Conversely, the cutlap technique is only used when glassing the blank with pigmented or tinted resin. the pool noofle padding, thanks. It is still possible to make your workspace pleasant and functional. With 40-grit sandpaper and a sanding block, sand the deck of your surfboard until it is flat and uniform.Pushing a Surform lengthwise along the rails, blend the rail bands until you have achieved the desired form.
surfboard shaping swaylocks Pay attention to this step as it will have a major impact on the way the board performs from its speed to its manoeuvrability and the potential it has to hold take-offs. When you are ready, pour half the mixture along the stringer line and the other half a couple of inches away from both rails. Transfer the measurements from your design onto the blank so you know how far in toward the stringer you should turn the rails. Most of the items we have listed here can be found in most general hardware stores. For glassing stands, this changes a bit. Work your way toward the stringer by moving from tail to nose, then from nose to tail. Often, you will hear surfers saying This is a fibreglass board, or This is an epoxy board. Whilst this refers to the type of resin used, it also points out the core material of that particular surfboard. With your template ready, take some time to double-check all measurements and scrutinise the curve to ensure it has no dips.
surfboard stand repair rack pvc surfboards shaping surf wood It is also worth mentioning that the use of power tools is not mandatory in the process of DIYing your surfboard. The act of shaping is probably the most fun, as well as the most romanticised part of building a surfboard. This website uses cookies to improve your experience. But before getting down to business, you should prepare the surface. Once you really start to get into surfing, or if you love to be creative, making your own surfboard is a really cool idea and one of the things a lot of surfers never get round to doing. These cookies will be stored in your browser only with your consent. Touch device users, explore by touch or with swipe gestures. We'll assume you're ok with this, but you can opt-out if you wish. PolyesterPolyester resin also needs a hardener to set its chemical transformation from liquid to solid in motion. and one 4 oz.) Many people fix this issue by wrapping masking tape around the stands contact points, using the torpedo level to ensure they are all even, and adding more tape where the height needs to be increased. For that reason, in this second instalment of our How To Make A Surfboard series, we will only touch on the basics of surfboard design hopefully enough to give you an idea of the type of surfboard you want to build as well as guide you on how to refine the blueprint into a template, then get that template turned into a board. This means that, if you have chosen to add colour to the resin and do a cutlap you should tape off the deck first. In a freelap, you will saturate the fibreglass overlaps with the resin of choice and stick it onto the underside of the blank. The same goes for glassing stands. These cookies do not store any personal information.
surfboard shaping stand stands surf flickr rack wooden build repair wood storage sharing surfboards racks english sup surfboard rack stand plans surf shapes shaping And if anything goes wrong in the process, you can always go back to the computer and change it. Your Shopping Cart will be saved with Product pictures and information, and Cart Totals. I'd still recommend the 20 gallon tree planters. Use either a Surform or a 60-grit sanding block to refine it to your liking, trying to keep both rails symmetrical and being careful not to damage your previous blending work. I'd like to offer my thoughts up for a base My son mows the foam in the backyard so this arrangement is really easy to carry out to the back yard grass and use under a temporary shade. The screw heads are counter sunk into the base and fastened with wing-nuts. Then, align the straight edge of the template with the centre of the stringer.With the template line-up, hold it down and trace the outline onto the blank with a shapers pencil.
surfboard shaping racks rack surfboards foamez layer on the bottom. Most of them but not all. The pros definitely outweigh the cons. One: To have fun. 6-8 minute readTravelling comes with the surfing package. You will hardly meet a surfer with Surfboard? 90 lbs each is a bit heavy but they are real sturdy.. A final and crucial note for this stage is to make what is known as relief cuts (usually in the shape of a V) along rounded sections and corners, particularly the nose and tail. Before anything, grab some masking tape and tape off the bottom surface outline. Before repeating the process on the other side, grab the electric sander/polisher and buff the lap line so it is smooth and even with the blank. Wax? For first-timers, it helps to write down the programme, as well as any measurements and specific guidelines you might forget. Then, wrap a sheet of 80-grit sanding screen around the nose section of the rail and walk back slowly toward the tail, pulling the screen lightly toward you. Eh? If thats not accessible, at least make sure you can shim your rack.
shaping stand help though sure am shelf, table, workbench, etc. Most people, depending on how they want the colouring, run a masking tape along the edge of the rail, but feel free to mask the entire bottom if you want. That is because, as we have mentioned, you will need to work on the underside of the blank when glassing, and therefore need the area to be free of obstructions. Other frequently used alternatives are: 4+44: Lightweight formula often used for competition surfboards4+46: Lightweight Plus variation with a sturdier bottom 6+46: Standard formula vastly used in commercial boards, particularly hybrids, eggs, and Fishes6+66: Heavy-duty formula specific to longboards. And all you will have to do is print it out, cut and tape the sheets of paper together, and trace the outline onto the permanent template. But perhaps more important than what you wear is keeping what you wear clean. wouldn't work. But that doesnt mean you have to settle for the rudiments of a temporary space. A template nearly always begins as a print-out of the design, which is then cut and transferred onto something more resistant and solid. The sharper the rail, the better the board works in smooth surfaces, allowing for hard, powerful, tight turns; the rounder the rail, the better the board works in choppy water, facilitating slower, smoother, wider turns.In general, the wider the plan shape the easier it is for the board to be turned, yet the more drag it produces. Finally, make sure your protective gear is clean a handy in a designated spot the more organised you are, the better! Before a surfboard exists, it must be conceived. Therefore, choosing a 7ft-long design doesnt mean you will be gliding width and thickness should be taken into account. 1999-2020 Swaylocks.com - All rights reserved, Swaylock's and Quiver are registered trademarks of Swaylocks.com, 0xcE50B20133612101F9d2BF4bc2CBdf71F6465f95. Speaking of surf shops, it can be helpful not to say enlightening to spend some time looking at what they have on the racks to have a feel for the different design features (e.g. After all, adding colour to your surfboard is an add-on; as a beginner, you should prioritise the essentials. You'll need two of these. Work carefully but fast you should take no more than 10 minutes. The height of 1050 mm is good for my height and the middle brace length of 1200 mm is good for shaping long boards. Thanks for the great post. Mine are almost exactly similar to Shipmans' and are planted in 10 or 20 gallon black tree planters (thanks Herb).
surfboard shaping stands build stand under varnish rat finished coat flash ready ll surfboard shaping rack building build guide greenlight stands stand surf repair shapes glassing plans templates tool pads sold visit This is done by grabbing either a rasp or a sanding block with 60 grit sandpaper and running it along the rails, trying to get rid of any bumps and dips in the outline whilst remaining a tiny bit away from the traced line. Firstly, let's run through the material list. Our support team has decades of experience making customers happy. Also, make sure you have a vacuum cleaner handy to clean up after each shaping/sanding session.
surfboard rack storage shed charlesandhudson pallet plans diy