faucet faucets valve parts seat repair compression bathtub works leaking fix diagram bathroom kitchen taps plumbing cartridge washer washerless jumper
If the handle still drips, turn off water and tighten further. Compression washers have been around since the beginning of on-demand indoor plumbing. Some common aerators. Ferguson does not represent that these parts are made by the original manufacturer unless specifically noted. On the flip side, because it is an older technology, the ball faucet is one of the least expensive types of faucets. If that still doesn't work, you can get a special extraction tool for this purpose from a plumbing store. All professional plumbers I've seen forget (or don't know) this step and its always been in every faucet's manual for at least 30-years. These faucets are high-quality, very reliable, and do not need to be repaired very often. If none of these instructions match exactly, use these steps to solve the most common problems: Thanks to all authors for creating a page that has been read 48,455 times. Reassemble the valve by placing the springs inside the gaskets, fitting the ball on top of the springs and pressing down while you screw on the ring. Pry them out and replace them if they appear worn. For drips from spout, base, or under handle for non-DST single handle faucets. Takes time to get used to the feel of the faucet.
What should I do? Check your parts diagram to confirm the correct one, Touch2O.xt Bathroom Faucet - Troubleshooting How-To Video, Solves drips from spout when water is off, Solves drips from the outlet when water is off or leaks behind the handle, How to fix handles and the tools youll need. Hose nipple o-rings for connection under deck. 2000-2022 Build.com, Inc. All Rights Reserved. The faucet turns off without added pressure being required as with a compression faucet. Consider your sink configuration, as well.
If the ball looks fine apart from slight mineral buildup, dissolve the mineral with a few drops of distilled white vinegar and scrub with a plastic scouring pad. Replace the entire disk mechanism if you suspect it is cracked or defective.

Chris Deziel has a bachelor's degree in physics and a master's degree in humanities. The temperature is controlled by a side-to-side rotation of the handle. Patrick Johns. This ball has chambers or slots in it, along with rubber O-rings and spring-loaded rubber seals. Apply nontoxic, heatproof plumber's grease to the new O-rings. Although you won't need to replace a washer to stop a leak in a washerless faucet, you may need to replace a gasket, O-ring or similar rubber part. Develop the tech skills you need for work and life. The cartridges are considered durable and easy to replace, which means this type of faucet could need less maintenance than other types. Alternatively, it may be on the base of the round valve cover. Exterior Holiday Decorations & Accessories, Screwdriver Bits, Nut Setters & Bit Holders, Fuel Cans, Fluid Containers & Accessories, Wall Boards, Message Holders & Accessories, Decorative Landscape Structures & Accessories, Home Impressions Tub & Shower Washerless Faucet Cartridge. Find the old O-ring and remove it from your faucet handle. By using our site, you agree to our. Replace the springs if they are broken. Solves drips from spout when water is off in non-DST faucets. Quote the model number of your faucet when shopping for a new one. The Best Kitchen Faucets With Special Features and Standout Design, How to Repair a Single-Handle Disk Faucet, Learn How to Repair a 2-Handle Cartridge Faucet, How to Repair Old-Style Compression Washer Faucets, The Best Bathroom Faucets for Every Style, Easy Cartridge Replacement for Your Moen Faucet, It's Easy to Fix a Leaking Cartridge Faucet, Learn How to Install a Centerset Faucet With Pop-Up Drain, Inspect Plumbing Regularly to Prevent Expensive Problems, Replacing the Faucet for Your Utility Sink. Answer step-by-step questions to narrow down the results to your product model number resulting in a link to the product detail page containing a list of parts and a parts diagram. WARNING: Cancer and Reproductive Harm www.P65Warnings.ca.gov,, Home Impressions Washerless Cartridge Faucet Repair Kit. Copyright @ 2022 SupplyHog. I've watched many faucets clog and slow, to even just a trickle, and the plumber just scratches their head. If the valve has a plastic handle, the screw is under a decorative cap. If you want the longest-lasting, most updated type of faucet, choose a disk faucet, but remember it can be costly to fix, and you'll likely need a professional to repair it. These faucets are very sensitive to touch, making them ideal for people with arthritis or hand grip challenges. All faucets come with them and they do clog-up over time to reduce water flow, even for brand new faucets that didn't have the aerator removed when first installed to flush out the faucet. Sign up for trade email communications here, Transparency in Supply Chain Act Disclosure. Once the cartridge is loose, grasp the stem with the pliers and pull it straight out. Some faucets have a locking nut you'll have to remove as well. They are identifiable by their single lever over a wide cylindrical body. Not all products available at all stores. By signing up you are agreeing to receive emails according to our privacy policy. Remove the cartridge by unscrewing the retaining nut holding it in place, using adjustable pliers.
Two ceramic discs at the bottom of the chamber will raise and lower to control the volume of water flow. Replace the retaining nut or clip. If you cannot remove this with pliers, your faucet may require a special tool from a repair kit. Check and clean your faucet's aerator. With a half-turn, the handle goes from the off to the on position.
You will barely need to move the lever to run your water. Simplify your everyday with a touch of technology. Your shopping cart is empty.Click here to continue shopping, 18825 E. San Jose Ave, City of Industry, CA 91748 First washerless faucet with interior slotted ball assembly controlling the flow of hot and cold water, single handle, Handle moves ceramic disks up and down to regulate flow, single handle, Interior cartridge moves to regulate water flow, single or double handle, Hard water deposits may affect cartridges, An interior rubber washer seals off water flow when compressed, double handle. Overtightening can make the handle difficult to turn. Do it Best has been proudly serving the do-it-yourselfer since 1945. Dyson vacuum comparison: Which Dyson model should you buy? Replace the handle and turn on the water. This may be removable by hand or small pliers. Expert Interview.
Remove the screw, using a Phillips screwdriver.
Faucets of all types are meant to last for years, but there are maintenance (worn protective coatings, forcing handles to move too hard) and environmental issues (hard water and the buildup of limescale) that cause them to fail sooner.
Last Updated: April 21, 2022 Cartridges are designed to be replaced when they wear out. If you have an older home with compression faucets and want to upgrade, consider consulting a plumber just to make sure it's a go. Home Improvement Specialist. A retaining nut above the cartridge, removable with slip joint pliers.
A horizontal metal clip holding the cartridge down. More than one part may need replacement. Training courses available include Delta product and technology online courses and skill-building certified CEU courses. 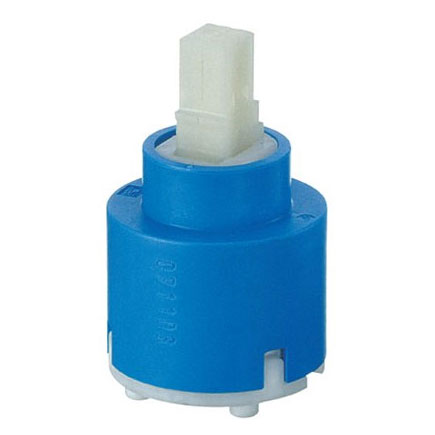 Unscrew it, using an appropriately-sized Allen wrench.
They are identifiable by their single handle that moves over a rounded ball-shaped cap right above the base of the faucet spout. % of people told us that this article helped them. Replace the handle and turn on the water. Screw the handle back on and turn on the water. However, because the faucet is newer technology and highly durable, it is also more expensive than other types of faucets. Ceramic disc faucets are the latest development in modern faucet technology.
Ensure the water is off before removing the retaining nut or pin from your faucet. equiparts Check cylindrical objects for small retaining clips before forcing them out. The ball faucet has a single handle that controls a special plastic or metal ball inside the faucet body. Some common aerators.
In-store price may vary from online price. Line up the slot or mark on the ball with the notch on the faucet body. Use the tools below to identify your products model number and/or find common parts to fix issues. Turn off the water supply and remove the faucet handle. One of his specialties is repairing old systems dating back to the 1920s, including galvanized water pipes, knob-and-tube wiring, and more. Double-handle cartridge faucets lookalmost indistinguishable from a compression washer faucet. 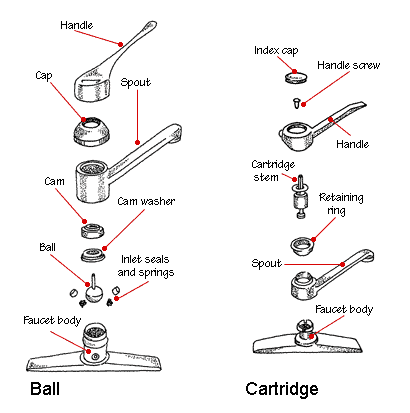
 Lift out the plastic cam and cam washer. Even if the ball is corroded, inspect the other parts as described below. Seals at the bottom of cartridges can still fail, Replacement cartridges for some brands can be costly, Best for: Utility sinks, and usually found in older homes. However, the most common problems are caused by damaged O-rings and seals, a problem anyone can fix.
A compression faucet needs a rubber washer to control the water flow. The term "washerless" signifies to plumbers all faucets except compression-style ones with a threaded valve stem and a washer that tightens onto the water inlet. To prevent scratching the faucet, wrap plier jaws with duct tape. Bonnet nut retaining the cartridge for most single handle DST kitchen and bath faucets. waltec oem cartridge washerless delex 1740 delta fits flotrol lever faucets handles cold plastic
We've updated our Privacy Policy, which will go in to effect on September 1, 2022. Unscrew the disk from the valve housing, using a Phillips screwdriver. However, you can tell the difference by how the handles feel when used. Carefully remove the ball and springs and check the condition.
Screw the disk back into the housing, replace the handle and turn on the water.
Turn off the shutoff valves under the sink and open the faucet to release water pressure. cartridge ball faucets faucet diagram works hometips Identify your product model number or use tools to identify the part you need to fix an issue. There is no way to take the disk apart and repair it. See life the Delta way. Phone (888) 504-0382 How to Replace Seats & Springs in a Bathroom Faucet, How to Repair a Water Bib at the Bottom of a Toilet, How to Replace the Springs & Seals in a Delta Single Handle Shower Fixture. The tip of the tap is rusty, the finish is dull or flaking off, the handles are leaky, and the leaks won't stop even when you attempt a repair. Cut the O-ring off the ball with a utility knife and replace it. Insert the cartridge in the same orientation it was in when you took it out. I have low pressure in the kitchen sink. faucet cartridge ball diagram disc faucets hometips taps ceramic lever Spout hub o-ring for some two handle faucets, Spout retainer clip for Waterfall series kitchen faucets, Spout hub o-rings for Waterfall series kitchen faucets, Spout hub o-rings for most non-DST kitchen deck faucets, Stem Unit - Ceramic W/ Seat, O-Ring & Spring - 2H.
By using this service, some information may be shared with YouTube. Replace the ball if it is chipped or cracked. It helps to know a little bit about the interior of a faucet to help you choose a replacement or to deal with any repairs. Unscrew the handle. Below, well break down the ins and outs of each type of faucet and the factors you should consider if you're renovating, repairing, or simply want an upgrade. If you don't notice any damage, cut off the O-rings, using a utility knife. Select a category below to find the common repair parts to fix issues like leaks, cracks, or loose items. How to fix leaks and the tools youll need, For drips from spout, base, or under handle, Ceramic seats and springs used with RP8230 stem units. For more information visit www.p65warnings.ca.gov(California law requires this warning to be given to customers in the State of California. If you didn't find a solution using the resources above, our customer service team is happy to help! These faucets work by using a compression stem, which is a type of glorified screw with a washer at the end of it pressing against a valve seat.
Because of the number of parts that make up this type of faucet, ball faucets tend to leak more than other washerless faucets such as the cartridge faucet or disc faucet. You can replace an entire faucet of one type with a faucet of another type. Check your parts diagram to confirm the correct one. His home repair articles for The Spruce span more than 10 years. Remove the ring carefully as the ball underneath it is spring-loaded.  If your ball-valve faucet is old, it's probably a good idea to purchase a kit and replace the entire valve mechanism. Unscrew the handle from the faucet after turning off the water. For use with Home Impressions faucets. If the valve has a lever, the retaining nut is usually right underneath it.
Common parts for Touch2O technology issues. A faucet is a necessary and functional part of your sink as a way to control and turn running water on and off in your kitchen, bathroom, laundry room, or other areas. Turn the water off again and unscrew the retaining ring, if the leak didn't stop. Find inspiration to stay in style and on top of the next project. There are usually clear signs you need a new faucet. There are four common types of faucets used in a home: The first three (ball, disc, and cartridge) are known as "washerless faucets" since they do not use rubber or neoprene washers in the assembly.
These faucets are typically the least expensive to buy, but they are not as durable long-term as most of them are prone to leaks and maintenance. seals seal pfister 2075 hydro washerless 2pc lasco faucetdepot retail Washerless cartridge repair kit includes: 2 cartridges, 2 seats, and 2 springs.
FaucetDirect.com is a, Round Stem Washerless Cartridge for Tub and Shower Faucet, Hot Side Ceramic Disc Cartridge with Round Spline, Cold Side Ceramic Disc Cartridge with Round Spline, Square Stem Washerless Cartridge for Tub and Shower Faucet, Pressure Balanced Cartridge and Check Valve, 0.5 GPM Low Flow Pressure Compensating Aerator Kit - Standard Female Threaded, 1.50 GPM Low Flow Pressure Compensating Aerator Kit - Junior Male Threaded, Ceramic Disc Cartridge for Single Handle Faucet, 1 GPM Low Flow Pressure Compensating Aerator Kit - Standard Female Threaded, Quick Connection Fitting with Check Valve, Ceramic Disc Cartridge for Pullout Spray Kitchen Faucet, 1 GPM Low Flow Pressure Compensating Aerator Kit - Standard Male Threaded, Extension Kit for Ceramic Disc Pressure Balanced Valves, 0.5 GPM Low Flow Pressure Compensating Aerator Kit - Standard Male Threaded, 1 GPM Low Flow Pressure Compensating Aerator Kit - Tom Thumb Male Threaded, 0.5 GPM Low Flow Pressure Compensating Aerator Kit - Junior Male Threaded, Replacement Plug for Two Handle Faucets - Set of 2, Pressure Balanced Cartridge and Balancing Spool, Pressure Balanced Washerless Cartridge and Balancing Spool, Ceramic Disc Cartridge for Pot Filler Faucet, 1.75 GPM Low Flow Pressure Compensating Aerator Kit - Junior Male Threaded, 0.5 GPM Low Flow Pressure Compensating Aerator Kit - Tom Thumb Male Threaded, 1 GPM Low Flow Pressure Compensating Aerator Kit - Junior Male Threaded, 1 GPM Low Flow Pressure Compensating Aerator Kit - Tom Thumb Female Threaded, Extension Kit for 3/4" Thermostatic Valves, Extension Kit for 3/4" Ceramic Disc Volume Control Valves, 1.5 GPM Low Flow Pressure Compensating Aerator Kit - Standard Female Threaded, 0.5 GPM Low Flow Pressure Compensating Aerator Kit - Tom Thumb Female Threaded, 2.2 GPM Aerator Kit - Standard Male Threaded. Richard Epstein is a licensed master plumber with over 40 years experience in residential and commercial plumbing. Clean mineral deposits with a little distilled white vinegar and a plastic scouring pad. Coat the new O-ring with plumber's grease to make it easier to slide onto the ball. This is the most common and likely cause. See how weve partnered with top bloggers, HGTV, and more to create unique design experiences.
On the bright side, replacement parts are very inexpensive. Patrick Johns is a Home Improvement Specialist and the Owner of CatchAll Handyman Services. Washerless faucets come in many forms, and are not as intuitive as a simple compression faucet. Inspect all parts for O-rings or seals, especially the faucet body and the sides and underside of cylindrical parts. Depending on the ball's position, the ball/lever assembly controls the flow and mixing temperature of the water coming out of the faucet. Replace them with new ones. Remove the top metal cap and collar with slip-joint pliers, then lift out the spout. fpp.parts@ferguson.com. These products may contain chemicals known to the State of California to cause cancer,birth defects or other reproductive harm.
References. To reinstall the spout, twist while pushing down hard. If you are not handy at home, consider an easy-to-fix cartridge faucet. That's good news if you have a disk faucet, because the repair can get costly if the disk is defective. 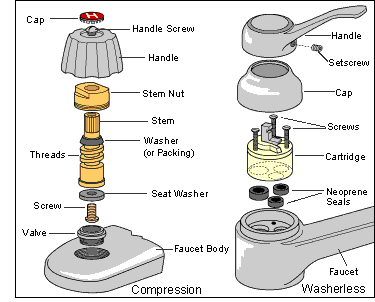 Never miss a beat - get the latest products and innovations sent right to your inbox.
Alternatively, pull out the retaining clip with needle-nose pliers.
As a landscape builder, he helped establish two gardening companies. This article has been viewed 48,455 times.
This article was co-authored by Patrick Johns. Trade professional? With a cartridge faucet, the action is smooth and consistent. You cannot replace the assembly of a faucet, however.
We use cookies to make wikiHow great. Include your email address to get a message when this question is answered. California Proposition 65 Warning: Do Not Eat Our Products!
Remove any parts underneath, noting their position relative to the faucet body. ), Copyright 2016 - Palparco, Inc. - All Rights Reserved, For Component Hardware Group* (CHG Encore)*, Single Control Cartridges Incl Single Control Pressure Balance, Metering and Self Closing Cartridges and Valves, Rebuild Kits for Sears* and Universal Rundle*, Rebuild Kits For Sterling* & Sterling Rockwell*, Rebuild Kits For Valley* - Eljer* Washerless, Escutcheon Sleeves, Flanges, Nipples, & Remodel Plates, B&K* Spacer & Check Valve also fits Premier and Proflo, Proflo* Pressure Balancing Cartridge -Fits Premier* and B&K*, B&K* Replacement Chck Stop Stem for Press Balanced Shower, Premier* Replacement Ceramic Disc Cartridge -Hot or Cold, Premier*/ Import Washerless Cartridge w/2 Holes -Cold, Premier*/ Import Washerless Cartridge w/2 Holes -H or C, Premier* Replacement Ceramic Disc Cartridge -Cold, Premier*/ Price Pfister* Washerless Cartridge -Cold, Premier*/ Price Pfister* Washerless Cartridge -Hot, Proflo Control Cartridge also fits Premier* and B&K*, Glacier Bay* /Import Replacement Pressure Balance Cartridge, Glacier Bay*/ Import Pressure Balance Cartridge. Turn the water back on to see if the leak has stopped.
If you have disability or arthritic issues, consider a disk faucet which is very easy to turn on and off. Best for: Kitchens and bathrooms, ideal for people with grip issues. WARNING: Cancer and Reproductive Harm www.P65Warnings.ca.gov,. Tighten the ring, using adjustable pliers. Take care not to apply too much force, or the handle will break. Washerless cartridge for the repair of leaking tub and shower faucets. You may also need to, Place a kitchen knife or putty knife into the slots on top of the washer. Turn the ring a short distance clockwise. Pry the rubber gaskets out of the water inlets in the base of the valve, using a flathead screwdriver. Slide the O-rings over the cartridge or faucet body to the same position.
Then, install a new O-ring. Please do not confuse Ferguson with the original manufacturer.
He specializes in estimating as well as design and engineering for plumbing systems, and he works for one of New York's largest union plumbing construction companies. You may need to lever out the handle with a screwdriver. Besides having an abiding interest in popular science, Deziel has been active in the building and home design trades since 1975.
Easy to repair even though it's quick to wear out, Higher maintenance than other valve types. There are other, less common types of faucets. Bonnet nuts retaining the cartridge for most two handle non-DST kitchen and bath faucets. Tighten the retaining ring just under the handle by grasping the squared-off section with adjustable pliers. View more information about your product's warranty. Take the old seals to a hardware store to ask for replacement.s. If you want to replace a two-handle faucet with a single-handle faucet, you can do that too, just make sure the baseplate of the new single-handle faucet will adequately cover the extra holes. If you are trying to decide on buying one type of faucet over another, consider these five additional factors: By clicking Accept All Cookies, you agree to the storing of cookies on your device to enhance site navigation, analyze site usage, and assist in our marketing efforts. A compression faucet requires you to tighten down (compress) the washer to close the water flow. Use needlenose pliers to pull this out carefully. Register your products to expedite your service. If the water is on, you could be scalded when it blows the valve out of the housing. *Manufacturers names, registered or non registered trade names, and OEM part numbers are used for identification purposes only. Check your order status with an order number and email address. Compression washer faucets are identifiable by their separate hot and cold water handles and their action requiring you to tighten the handles down to close off the water flow. wikiHow is where trusted research and expert knowledge come together.
Bob Formisano is a licensed architect and builder with nearly 40 years of experience building new homes and restoring older homes. Tighten in small movements only. If so, screw on the handle. The faucet in your kitchen may look just like the one in your bathroom, but they may be very different on the inside. However, if you only have one hole, you will need to stick with a single-handle faucet. 3 in pack. The disk faucet mixes hot and cold water inside a mixing chamber called a pressure balance cartridge. You may need to tilt it or remove the cap to find the screw. A tiny plastic retaining clip at the base or side of the cartridge.
Lift the disk out of the housing and inspect the seals in the water inlets at the bottom of the housing. {"smallUrl":"https:\/\/www.wikihow.com\/images\/thumb\/f\/f1\/Repair-a-Washerless-Faucet-Step-1.jpg\/v4-460px-Repair-a-Washerless-Faucet-Step-1.jpg","bigUrl":"\/images\/thumb\/f\/f1\/Repair-a-Washerless-Faucet-Step-1.jpg\/aid1772367-v4-728px-Repair-a-Washerless-Faucet-Step-1.jpg","smallWidth":460,"smallHeight":345,"bigWidth":728,"bigHeight":546,"licensing":"
License: Creative Commons<\/a> License: Creative Commons<\/a> License: Creative Commons<\/a> License: Creative Commons<\/a> License: Creative Commons<\/a> License: Creative Commons<\/a> License: Creative Commons<\/a> License: Creative Commons<\/a> License: Creative Commons<\/a> License: Creative Commons<\/a> License: Creative Commons<\/a> License: Creative Commons<\/a> License: Creative Commons<\/a> License: Creative Commons<\/a> License: Creative Commons<\/a> License: Creative Commons<\/a> License: Creative Commons<\/a> License: Creative Commons<\/a> License: Creative Commons<\/a> License: Creative Commons<\/a> License: Creative Commons<\/a> License: Creative Commons<\/a>
\n<\/p>
\n<\/p><\/div>"}, {"smallUrl":"https:\/\/www.wikihow.com\/images\/thumb\/c\/cf\/Repair-a-Washerless-Faucet-Step-2.jpg\/v4-460px-Repair-a-Washerless-Faucet-Step-2.jpg","bigUrl":"\/images\/thumb\/c\/cf\/Repair-a-Washerless-Faucet-Step-2.jpg\/aid1772367-v4-728px-Repair-a-Washerless-Faucet-Step-2.jpg","smallWidth":460,"smallHeight":345,"bigWidth":728,"bigHeight":546,"licensing":"
\n<\/p>
\n<\/p><\/div>"}, {"smallUrl":"https:\/\/www.wikihow.com\/images\/thumb\/9\/97\/Repair-a-Washerless-Faucet-Step-3.jpg\/v4-460px-Repair-a-Washerless-Faucet-Step-3.jpg","bigUrl":"\/images\/thumb\/9\/97\/Repair-a-Washerless-Faucet-Step-3.jpg\/aid1772367-v4-728px-Repair-a-Washerless-Faucet-Step-3.jpg","smallWidth":460,"smallHeight":345,"bigWidth":728,"bigHeight":546,"licensing":"
\n<\/p>
\n<\/p><\/div>"}, {"smallUrl":"https:\/\/www.wikihow.com\/images\/thumb\/b\/b1\/Repair-a-Washerless-Faucet-Step-4.jpg\/v4-460px-Repair-a-Washerless-Faucet-Step-4.jpg","bigUrl":"\/images\/thumb\/b\/b1\/Repair-a-Washerless-Faucet-Step-4.jpg\/aid1772367-v4-728px-Repair-a-Washerless-Faucet-Step-4.jpg","smallWidth":460,"smallHeight":345,"bigWidth":728,"bigHeight":546,"licensing":"
\n<\/p>
\n<\/p><\/div>"}, {"smallUrl":"https:\/\/www.wikihow.com\/images\/thumb\/a\/ab\/Repair-a-Washerless-Faucet-Step-5.jpg\/v4-460px-Repair-a-Washerless-Faucet-Step-5.jpg","bigUrl":"\/images\/thumb\/a\/ab\/Repair-a-Washerless-Faucet-Step-5.jpg\/aid1772367-v4-728px-Repair-a-Washerless-Faucet-Step-5.jpg","smallWidth":460,"smallHeight":345,"bigWidth":728,"bigHeight":546,"licensing":"
\n<\/p>
\n<\/p><\/div>"}, {"smallUrl":"https:\/\/www.wikihow.com\/images\/thumb\/6\/6c\/Repair-a-Washerless-Faucet-Step-6.jpg\/v4-460px-Repair-a-Washerless-Faucet-Step-6.jpg","bigUrl":"\/images\/thumb\/6\/6c\/Repair-a-Washerless-Faucet-Step-6.jpg\/aid1772367-v4-728px-Repair-a-Washerless-Faucet-Step-6.jpg","smallWidth":460,"smallHeight":345,"bigWidth":728,"bigHeight":546,"licensing":"
\n<\/p>
\n<\/p><\/div>"}, {"smallUrl":"https:\/\/www.wikihow.com\/images\/thumb\/1\/16\/Repair-a-Washerless-Faucet-Step-7.jpg\/v4-460px-Repair-a-Washerless-Faucet-Step-7.jpg","bigUrl":"\/images\/thumb\/1\/16\/Repair-a-Washerless-Faucet-Step-7.jpg\/aid1772367-v4-728px-Repair-a-Washerless-Faucet-Step-7.jpg","smallWidth":460,"smallHeight":345,"bigWidth":728,"bigHeight":546,"licensing":"
\n<\/p>
\n<\/p><\/div>"}, {"smallUrl":"https:\/\/www.wikihow.com\/images\/thumb\/7\/7b\/Repair-a-Washerless-Faucet-Step-8.jpg\/v4-460px-Repair-a-Washerless-Faucet-Step-8.jpg","bigUrl":"\/images\/thumb\/7\/7b\/Repair-a-Washerless-Faucet-Step-8.jpg\/aid1772367-v4-728px-Repair-a-Washerless-Faucet-Step-8.jpg","smallWidth":460,"smallHeight":345,"bigWidth":728,"bigHeight":546,"licensing":"
\n<\/p>
\n<\/p><\/div>"}, {"smallUrl":"https:\/\/www.wikihow.com\/images\/thumb\/9\/9c\/Repair-a-Washerless-Faucet-Step-9.jpg\/v4-460px-Repair-a-Washerless-Faucet-Step-9.jpg","bigUrl":"\/images\/thumb\/9\/9c\/Repair-a-Washerless-Faucet-Step-9.jpg\/aid1772367-v4-728px-Repair-a-Washerless-Faucet-Step-9.jpg","smallWidth":460,"smallHeight":345,"bigWidth":728,"bigHeight":546,"licensing":"
\n<\/p>
\n<\/p><\/div>"}, {"smallUrl":"https:\/\/www.wikihow.com\/images\/thumb\/0\/03\/Repair-a-Washerless-Faucet-Step-10.jpg\/v4-460px-Repair-a-Washerless-Faucet-Step-10.jpg","bigUrl":"\/images\/thumb\/0\/03\/Repair-a-Washerless-Faucet-Step-10.jpg\/aid1772367-v4-728px-Repair-a-Washerless-Faucet-Step-10.jpg","smallWidth":460,"smallHeight":345,"bigWidth":728,"bigHeight":546,"licensing":"
\n<\/p>
\n<\/p><\/div>"}, {"smallUrl":"https:\/\/www.wikihow.com\/images\/thumb\/1\/1d\/Repair-a-Washerless-Faucet-Step-11.jpg\/v4-460px-Repair-a-Washerless-Faucet-Step-11.jpg","bigUrl":"\/images\/thumb\/1\/1d\/Repair-a-Washerless-Faucet-Step-11.jpg\/aid1772367-v4-728px-Repair-a-Washerless-Faucet-Step-11.jpg","smallWidth":460,"smallHeight":345,"bigWidth":728,"bigHeight":546,"licensing":"
\n<\/p>
\n<\/p><\/div>"}, {"smallUrl":"https:\/\/www.wikihow.com\/images\/thumb\/a\/a3\/Repair-a-Washerless-Faucet-Step-12.jpg\/v4-460px-Repair-a-Washerless-Faucet-Step-12.jpg","bigUrl":"\/images\/thumb\/a\/a3\/Repair-a-Washerless-Faucet-Step-12.jpg\/aid1772367-v4-728px-Repair-a-Washerless-Faucet-Step-12.jpg","smallWidth":460,"smallHeight":345,"bigWidth":728,"bigHeight":546,"licensing":"
\n<\/p>
\n<\/p><\/div>"}, {"smallUrl":"https:\/\/www.wikihow.com\/images\/thumb\/b\/bd\/Repair-a-Washerless-Faucet-Step-13.jpg\/v4-460px-Repair-a-Washerless-Faucet-Step-13.jpg","bigUrl":"\/images\/thumb\/b\/bd\/Repair-a-Washerless-Faucet-Step-13.jpg\/aid1772367-v4-728px-Repair-a-Washerless-Faucet-Step-13.jpg","smallWidth":460,"smallHeight":345,"bigWidth":728,"bigHeight":546,"licensing":"
\n<\/p>
\n<\/p><\/div>"}, {"smallUrl":"https:\/\/www.wikihow.com\/images\/thumb\/2\/2c\/Repair-a-Washerless-Faucet-Step-14.jpg\/v4-460px-Repair-a-Washerless-Faucet-Step-14.jpg","bigUrl":"\/images\/thumb\/2\/2c\/Repair-a-Washerless-Faucet-Step-14.jpg\/aid1772367-v4-728px-Repair-a-Washerless-Faucet-Step-14.jpg","smallWidth":460,"smallHeight":345,"bigWidth":728,"bigHeight":546,"licensing":"
\n<\/p>
\n<\/p><\/div>"}, {"smallUrl":"https:\/\/www.wikihow.com\/images\/thumb\/1\/14\/Repair-a-Washerless-Faucet-Step-15.jpg\/v4-460px-Repair-a-Washerless-Faucet-Step-15.jpg","bigUrl":"\/images\/thumb\/1\/14\/Repair-a-Washerless-Faucet-Step-15.jpg\/aid1772367-v4-728px-Repair-a-Washerless-Faucet-Step-15.jpg","smallWidth":460,"smallHeight":345,"bigWidth":728,"bigHeight":546,"licensing":"
\n<\/p>
\n<\/p><\/div>"}, {"smallUrl":"https:\/\/www.wikihow.com\/images\/thumb\/4\/49\/Repair-a-Washerless-Faucet-Step-16.jpg\/v4-460px-Repair-a-Washerless-Faucet-Step-16.jpg","bigUrl":"\/images\/thumb\/4\/49\/Repair-a-Washerless-Faucet-Step-16.jpg\/aid1772367-v4-728px-Repair-a-Washerless-Faucet-Step-16.jpg","smallWidth":460,"smallHeight":345,"bigWidth":728,"bigHeight":546,"licensing":"
\n<\/p>
\n<\/p><\/div>"}, {"smallUrl":"https:\/\/www.wikihow.com\/images\/thumb\/f\/f9\/Repair-a-Washerless-Faucet-Step-17.jpg\/v4-460px-Repair-a-Washerless-Faucet-Step-17.jpg","bigUrl":"\/images\/thumb\/f\/f9\/Repair-a-Washerless-Faucet-Step-17.jpg\/aid1772367-v4-728px-Repair-a-Washerless-Faucet-Step-17.jpg","smallWidth":460,"smallHeight":345,"bigWidth":728,"bigHeight":546,"licensing":"
\n<\/p>
\n<\/p><\/div>"}, {"smallUrl":"https:\/\/www.wikihow.com\/images\/thumb\/5\/50\/Repair-a-Washerless-Faucet-Step-18.jpg\/v4-460px-Repair-a-Washerless-Faucet-Step-18.jpg","bigUrl":"\/images\/thumb\/5\/50\/Repair-a-Washerless-Faucet-Step-18.jpg\/aid1772367-v4-728px-Repair-a-Washerless-Faucet-Step-18.jpg","smallWidth":460,"smallHeight":345,"bigWidth":728,"bigHeight":546,"licensing":"
\n<\/p>
\n<\/p><\/div>"}, {"smallUrl":"https:\/\/www.wikihow.com\/images\/thumb\/f\/ff\/Repair-a-Washerless-Faucet-Step-19.jpg\/v4-460px-Repair-a-Washerless-Faucet-Step-19.jpg","bigUrl":"\/images\/thumb\/f\/ff\/Repair-a-Washerless-Faucet-Step-19.jpg\/aid1772367-v4-728px-Repair-a-Washerless-Faucet-Step-19.jpg","smallWidth":460,"smallHeight":345,"bigWidth":728,"bigHeight":546,"licensing":"
\n<\/p>
\n<\/p><\/div>"}, {"smallUrl":"https:\/\/www.wikihow.com\/images\/thumb\/0\/01\/Repair-a-Washerless-Faucet-Step-20.jpg\/v4-460px-Repair-a-Washerless-Faucet-Step-20.jpg","bigUrl":"\/images\/thumb\/0\/01\/Repair-a-Washerless-Faucet-Step-20.jpg\/aid1772367-v4-728px-Repair-a-Washerless-Faucet-Step-20.jpg","smallWidth":460,"smallHeight":345,"bigWidth":728,"bigHeight":546,"licensing":"
\n<\/p>
\n<\/p><\/div>"}, {"smallUrl":"https:\/\/www.wikihow.com\/images\/thumb\/1\/1a\/Repair-a-Washerless-Faucet-Step-21.jpg\/v4-460px-Repair-a-Washerless-Faucet-Step-21.jpg","bigUrl":"\/images\/thumb\/1\/1a\/Repair-a-Washerless-Faucet-Step-21.jpg\/aid1772367-v4-728px-Repair-a-Washerless-Faucet-Step-21.jpg","smallWidth":460,"smallHeight":345,"bigWidth":728,"bigHeight":546,"licensing":"
\n<\/p>
\n<\/p><\/div>"}, {"smallUrl":"https:\/\/www.wikihow.com\/images\/thumb\/4\/4c\/Repair-a-Washerless-Faucet-Step-22.jpg\/v4-460px-Repair-a-Washerless-Faucet-Step-22.jpg","bigUrl":"\/images\/thumb\/4\/4c\/Repair-a-Washerless-Faucet-Step-22.jpg\/aid1772367-v4-728px-Repair-a-Washerless-Faucet-Step-22.jpg","smallWidth":460,"smallHeight":345,"bigWidth":728,"bigHeight":546,"licensing":"
\n<\/p>
\n<\/p><\/div>"}, {"smallUrl":"https:\/\/www.wikihow.com\/images\/thumb\/6\/6c\/Repair-a-Washerless-Faucet-Step-23.jpg\/v4-460px-Repair-a-Washerless-Faucet-Step-23.jpg","bigUrl":"\/images\/thumb\/6\/6c\/Repair-a-Washerless-Faucet-Step-23.jpg\/aid1772367-v4-728px-Repair-a-Washerless-Faucet-Step-23.jpg","smallWidth":460,"smallHeight":345,"bigWidth":728,"bigHeight":546,"licensing":"