There are different workflows for doing that, but one of the more commonly used technique is to make a high poly (usually in ZBrush) and baking it to the low poly mesh. texture rock painted hand demo hour It is useful to know the max polycount allocated for the scene so that you could manage it properly. Paint your 3D models faster using Brushes, Smart Materials, and layers, Create hand-painted and PBR textures. All the three functions described can be combined in any way. In this part, you can also see which position looks best for the final render, especially when you don't have a detailed concept and you must decide how to present it. For the green layer, set the Output to Bottom Edge and click OK. Now do the same for the red layer but this time set the Output to Right Edge. You can see the high-quality PBR textures from the 3D Coat FREE PBR Library: Here is the main brush bar. FREE Library of 500+ PBR scanned materials and 1200+ PBR Samples in different resolutions up to 8K. texture rock painted hand demo hour If the Equalize Light setting doesnt work, you can try the Normalize Brightness filter after using Make Seamless. All 3DCoat Voxel Modeling and Render inside. This program is very convenient as you can texture the model while sculpting it. After clicking OK, rename this layer normal and hide every layer. ials as well as lighting.  Eddie takes pride in helping creative professionals overcome the barriers of technology and software so that they can effortlessly harness their creativity in their own projects. A simple way to produce various maps (height/displacement, normal, colour), Setup exported material into Substance Alchemist to create a PBR-ready material and/or texture maps, Quick setup in Marmoset to test the material exports. This part is very important for low poly props in which you want to obtain the best look using as few polygons and texture space as possible. We offer discounts on multiple licenses ordered in one batch, as shown below: You can Upgrade to version 2021 now! If you dont already have it, make sure to install GMIC. I tend to use Pixabay to find my photo textures. You can also create your own custom brushes, shapes. Each can be active and non-active.When you draw 3D models in any way, this affects the result. textures painted hand pm posted
  lava texture textures painted hand Bruno Parrela gives us a quick tutorial showing us how to create a WoW Inspired asset, using hand painted texturing techniques. At this point the cavity map is finished but you may want to adjust its contrast in case the highlights are too harsh and/or smooth it out with the Thin Brush filter if its too noisy. The cavity map most likely has seams so youll want to try using Make Seamless and if that doesnt work, clean up the edges using the clone tool like you did before. Once merge, desaturate this new layer using the Min option. My modeling process starts with the concept art. However, wed like to incorporate the surface details we see in the diffuse map into the shading or lighting performed by the game engine. There is not a huge difference but as I mentioned before, in most cases (for PBR workflow) if you want a more realistic effect for your materials, you dont want to have any shading information within the Albedo map. From the normal map well create the cavity map. Unlimited learning for Free. So if you're ready to learn environment art, texturing, or rendering from the ground up, or your graphic designs lack that special "it" factor, let Eddie unlock your potential as an artist. The camera's field of view was changed from 45 to 70 to get a wider render. These resources were created with the 2020.1.4 version of ZBrush. If you want me to keep you in the loop, drop your name and email below so you don't miss ouT! These three icons are very important. The latter is really important, especially when you are a beginner because most of the time the projects don't go as planned and things can get really frustrating. One of the things I try to achieve in stylized projects is a good overall shape which is the key. I am switching to another subscription plan. Here you see me smoothing out layer 1. Dont worry, I hate spam too. www.zbrushguides.com is in no way affiliated with Pixologic, Inc. Color: The first thing that I do for color is doing a color layer over the grayscale. The first split is the small details, the second is the medium details, the third is the large details, and the fourth is the residual or whats left over. The next step is to start painting the texture, giving gradients to the flat colors and details, always keeping in mind where the light is coming from. This pack of 54 custom brushes are a resource to help you sculpt and detail clothes and other types of fabric in ZBrush.
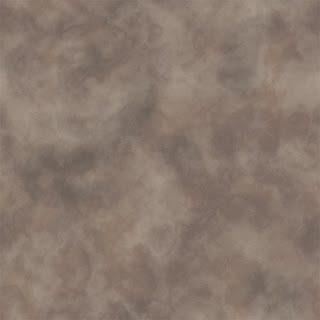
  To do that, well need to create a normal map. cel stylized textur rocks obrazy znalezione zapytania mapping huaban gameart ulrick rochas wery digitalart rocas polycount luxxuhome The cavity map allows us to highlight the sharp ridges and shadow the narrow crevices found in the texture.
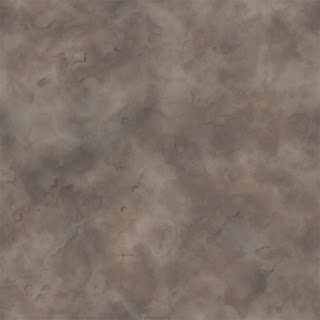
  Make sure to find one evenly lit and head on when browsing through the photos. Modern Slavery Act Transparency Statement, Access thousands of videos to develop critical skills, Give up to 10 users access to thousands of video courses, Practice and apply skills with interactive courses and projects, See skills, usage, and trend data for your teams, Prepare for certifications with industry-leading practice exams, Measure proficiency across skills and roles, Align learning to your goals with paths and channels. For the scene Ive made some changes after getting feedback which is really important in the process, and I did a more vertical approach for the scene, differently than the concept that Ive created,and I end up with this: Uvs are a pretty important part of the process and you want to do the perfect cuts to match the forms in the model and to facilitate your life when going to paint in Photoshop. A collection of 50 custom brushes for ZBrush 2021.5.1 (or above) to detail, texture and refine surfaces for creatures. Below is a way Ive come up with for approximating the hand-painted look that can stand on its own or if needed be the basis for a hand-painted texture without having to start from a blank canvas. Modeling for mobile games has more technical barriers than doing it for PC or console. Ive uploaded the model to Sketchfab so you can take a closer look. It works similar to Sketchfab and allows you to export the viewer after finishing it in order to upload it on the web. In most cases, for a PBR workflow, you probably want to have an Albedo map that has no shading information (pure colour, no lighting, or anything else). Eddie's favorite project as a tutor has been taking part in the Transforming Robot Production Pipeline series. The goal here is to see the brush strokes so having it rough around the edges is fine. textures painted hand 2d I also try to keep in mind whether I have to model certain details or I can paint them on the texture.
That being said, you need to be careful and technical in this part of the process. So far weve been working on the diffuse map.
My name is Jonathan Cuevas and I'm 23. After that, I paint the occlusion and the shadows. Select categories to narrow your search!Or use the search if you know what you specifically want to learn (wood, artist name, etc). Select the blue layer and set it to multiply. The pack also comes with Bonuses including 30 PBR fabric materials and 20 tileable noise alphas. However, in the interest of documenting the most involved case, Ill demonstrate the technique by creating a seamless/tileable, square, power-of-two texture which tends to be the most versatile. You can do this with the warp tool. The final part of my modeling workflow is to unwrap the UVs, making sure that I have a good texel density, naming everything, and assigning materials to the meshes. The focus of the update is on specific areas of the face and to provide a simple workflow to create patterns, pores, and wrinkles while giving We use cookies to ensure that we give you the best experience on our website. The nice thing about this technique is that you can dial in how much or how little stylization you want. Your game engine can also use it when it applies the ambient lighting. Here you can do sculpting, modeling, create UVs and render. Recall that our goal is to remove just enough detail to reveal the hidden hand painted texture underneath. Don't have an account? The first one is Depth. When I start to paint, the first step is to give the mesh the main colors, just flat ones, so that I can get an idea of the exact tones I need. Which can be challenging but its really fun to do concepts I really love! Wellness + Sustainability: Tools Designers Need No, Process: Treat learning a new skill like a design problem, My journey with pro-bono service designpart 1. My experience with Unreal storytelling Fellowship-Week 1, Customizing Squarespace Newsletter Form Button and More.
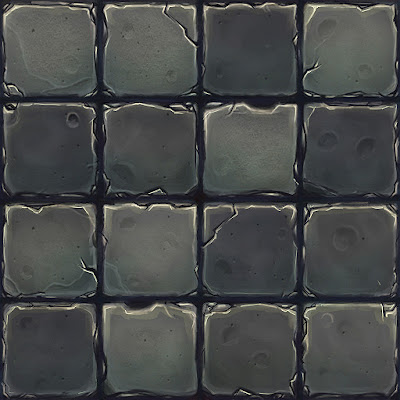
For example, here you see Make Seamless applied to layer 2. lamp poly low painted blender texture hand create timelapse The seams should be more or less gone now. Moving to the modeling part I used Blender to model everything.The first thing that you want to do is the blockouts, in a diorama like this its better blockout everything first to see if the scene is looking good and harmonious, and if the shapes are matching together. To facilitate you the work, 3DCoat provides Smart Materials which simplify and automate your results.You can also export your textures as PBR maps, so those could then be transferred into other editors.You can also find many hand painted texture tutorial on our official YouTube channel to help you learn the program faster. I tried to learn about video game development on my own, searching on the internet for the ways video games were made and software the artists used. At this point, youll want to look up how to create a normal map using your preferred program. I often email my subscriberswith cool tips and tricks, new developments, relevant information,upcoming guides, courses and more! Two years and a bunch of projects later, I finished the studies knowing how to use the software, but my skills were far away from my current level. The strong pressure makes it decrease and the weak one - increase. In the example that Ive I tried to use cool color to contrast with the warm colors that I have in my scene, this helps to give a better balance on your art. We'll slowly begin to layer additional detail on top of this until we are happy with the look of the diffuse textures. With GMIC open, find the Make Seamless [Diffusion] filter. Here you can see how simply a dinosaur texture can be created using the "stencils" panel.
Creating your custom Scar brush in ZBrush. I tend to use Sobel or Simple the most. Therefore, 3DCoat is a program with user-friendly interface and many modern and convenient tools for texturing and hand-painting. Although the workflow I explain in this tutorial is specific to the creation of human skin, its a process that can be applied to anything you want. . For more information about the cookies we use or to find out how you can disable cookies, click here. To help make the texture seamless, try to crop it in such a way that the left and right and the top and bottom sort of mirror each other. These are the ideals settings Ive found but feel free to experiment.
You could also play with other maps like theHeight map. In this video tutorial, Ill walk you through the new ZBrushCore MINI including an overview of the user interface, sculpting brushes and sculpting workflows. After using Brushify on layer 4 and Smooth [Thin Brush] on layers 1 through 3, we have seams again. We'll learn how to paint bump, specular, gloss, reflectance and emissive maps that will all work together to create the look of our creature. In this scene, I used the same process described up above to create the wood, roof, grass, water, rope, bark, butterfly, rock, leaves, shrub, and metal texture. It adds a whimsically fantastical feel that photorealism lacks. Every month you will have 120 points, which you can spend on smart materials, samples, masks and reliefs. This will help you customize your 3DCoat, so it best suits your needs. So, to get started, you need to select Paint UV Mapped Mesh (Per-Pixel) in the launch window. Typically, layer 3 is enough but sometimes I add in layer 2 as well. Essential Strategies for Hand Painting Textures in MARI. The hand-painted look is a compelling game art style.
Substance Painter VS Quixel Mixer Which one would I use. where we share breakdowns, the latest news, awesome artworks, and more. Here I have some of the references that Ive collected for the Kaelthas Shrine: After collecting the references I go to the concepting part! Notice the uneven lighting where it looks pinched in certain spots. That's not the case in stylized art; here you try to have a good visual impact, exaggerating the shapes and relegating the details to a second plane that gives an unrealistic look, similar to fantasy worlds or cartoons. One of the most important things in the process is collecting references, good references always help you to do something cool about the type of art that youre aiming for, so keep that in mind references are REALLY important! If I have a baked occlusion, I put it in a multiply layer on top. renderman community pixar textures texture This process produces a BaseColor that has some material properties baked into the map. After the edge detection, merge the green layer into the red layer and then merge the blue layer into the red layer. And this helped me a lot growing up as an artist, I HIGLY recommend Brushforges class if you want to learn more about handpainted art! Depending on the force of the pressure, the transparency changes. Upgrade node-locked to floating option available for the following licenses: 3DCoat is the application that has all the tools you need to take your 3D idea from a block of digital clay all the way to a production-ready, fully textured organic or hard surface model. texture painted hand textures rock painting game polycount seamless brick demo hour paint rocks 3d spent hours making handpainted quick Unlimited learning for Free. How to set up a ZBrush tool for sculpting and painting tileable textures. Now take this layer and desaturate it using the average setting. For the references I like to research in Artstation, Pinterest and Google! He's also contributed creative training articles to both Photoshop Creative and ImagineFX. Eddie began teaching creative professionals over ten years ago for Digital Tutors. It combines different technologies: voxels and polygons - for 3D model creation. You'll want the raised areas to be white and the recessed areas to be a soft grey. Grayscale: This is one of the most important part in my process because once I have a strong grayscale, its more easy to build the color over it, for the grayscale I use 3dcoat. Below are a few images rendered with he maps from this tutorial. lowlypoly zbrush The diffuse map defines the color of your game model as if it was fully lit. What do you paint first? The second one is Albedo. This map allows us to shadow the larger recessed regions in our texture that receive less light. Enjoy and wishing you a great creativity with 3DCoat! Copyright 2004 - 2022 Pluralsight LLC. In this short tutorial series, Im going to walk you through some of my favourite features from the ZBrush 2021.6.2 update. texture textures visual mapping uv painting hand 3d game paint painted gcse stone lessons suitable aid lesson question The process starts with a real photo. Get this Functions in 3DCoat that you might not know about. 3DCoatPrint is a special FREE version of 3DCoat with voxel modeling designed for the fast creation of print-ready 3D models. Ive found this smoothing filter to work the best for this step but feel free to try the others. For the best possible experience on our website, please accept cookies. Transform your 3D texturing skills with hundreds professional-level assets, and hours of high quality tutorials. At school, I learned about many sides of game art: modeling, animation, texturing, assets creation, and engines such as Unreal Engine and Unity. Thank you so much for the walkthrough it was very illuminating. After that, you get the ambient occlusion map and use it in a multiply layer in Photoshop which will give you all the details of the high poly on the albedo map. The next step is modeling all the small details, getting the shapes correctly, and arranging the groups of small props that can share UV space. To start things off, we'll learn how to get our geometry into MARI, set up some image based lighting and prepare both channels and a shader for painting. The cavity map and ambient occlusion map tend to overlap but in general the ambient occlusion map shadows the larger occluded areas while the cavity map handles the smaller occluded areas. We will add the new 2021 license key to your account. I take out most of the detail, retaining just a slight hint of the surface detail found on the stones and moss. Set the blend mode for cavity to overlay. When you have a strong composition and silhouette its time the fun part: doing the medium/small shapes for each piece. We use cookies on this website to make your browsing experience better. When using a graphics tablet or a vacuum screen, these brushes work as follows: There is also an Alpha panel where you can select Alphas for brush. After a few months, we started using 3ds Max, and within the first hours, something clicked in my mind. I have done some courses like drawing, digital painting,modeling/sculpting, and I found my passion doing 3d hand painted art especially with prop making. However, actually achieving the look can be quite tedious sometimes requiring hours for a single texture. The first thing that I do since Ive imported the model is calculate the occlusion of the mesh(textures>calculate occlusion).After the occlusion I do a gradient with the gradient tool, and set the layer in overlay or hardlight. I usually don't do high poly, though, because I prefer to paint directly on the low poly mesh using a combination of Substance Painter and Photoshop. I started to craft my works daily in my spare time when I was off work, doing my best and exploring all the styles and ways of creating art. If you found this useful, I'd appreciate if you help me spread the word ;). You want it to look like the colors and shading have all been roughed in but havent been smoothed out yet. A couple of years later, knowing barely anything about the technical aspects of video game creation, I decided to get a Certificate of Higher Education in 3D Animation. After the silhouettes test its time to do the lineart and the painting. If you are just starting out hand painting textures, you probably have a number of questions regardless of what application you are using. In this video tutorial, Ill walk you through a few Polypainting techniques to texture skin. With 3DCoats rendering room you can get quality results fast. If you continue to use this site we will assume that you are happy with it. Next, we'll move in and start painting some additional texture maps that we'll need for this asset. How do you choose the right color? Before you can import a model with this option, make sure the model has a UV map. This principle makes it very easy to work with, because to create a texture for any model you just need to draw on it like in 2D graphics editors. You can see them on the top toolbar. With these maps, you can now move over to your modeling program (I use Blender) and assemble your material. For Krita, it has a built-in filter called Height to Normal Map. You have a Free upgrade available. texture ground painted hand handpainted My name is Bruno Fortuna Parrela and Im a 23 year old 3D prop artist from Brazil. I LOVE doing this part, and I will show you how I did the orbs and the other glowy stuff so lets dive right in! I prefer to do concepts like this because it helps my brain to understand what I need to do in the modeling part, and its not the final art, its just a guide for your project. Save my name, email, and website in this browser for the next time I comment. Hey, wanna join the ZBrushGuides and 3DConceptArtist newsletter? Sign up to get immediate access to this course plus thousands more you can watch anytime, anywhere.
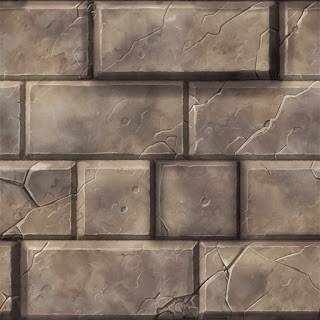
Let's take a look at the top 5 Brushes. Depending on how painted you want it to look, play around with the Number of Sizes. For the Kaelthas Shrine Ive made blockouts of the main shapes in Blender and then I just start sketching! By using the site you agree to our use of cookies.Learn more. If you need additional textures visit the library of FREE textures for 3DCoat from where you can download them. For example, the polycount and the textures have to be a lot lower due to the device limitations. After splitting the details, run layer 4 through the Brushify filter found in GMIC. However, that principle was inconvenient and complicated, so today any 3D editor has the function of Hand Painting over the 3D model. texturen polycount For layers 1, 2, and 3, youll want to smooth out the details until they each have that chunky, painterly look.
The final part andthe most fun is texturing! After that, I keep taking screenshots throughout the process to compare the evolution of the textures. Creating and Connecting Channels to a Shader, Beginning to Build Detail Onto the Skin Base. Click to share on Twitter (Opens in new window), Click to share on Facebook (Opens in new window), The Environment Artists Survival Kit Unreal Engine Course for Beginners, Stylized Chinese Lantern Shop Breakdown, Genshin Impact Vending Machine Breakdown. When activated, you can see how the illusion of Depth is created. course plus top-rated picks in tech skills and other popular topics. Make it easy in 3D : Sculpting, Voxels, Modeling, Retopo, Painting, Texturing with PBR, UV and Rendering. You dont need to be perfect in this stage , try to find the big shapes to have a better idea of what will be the next step!